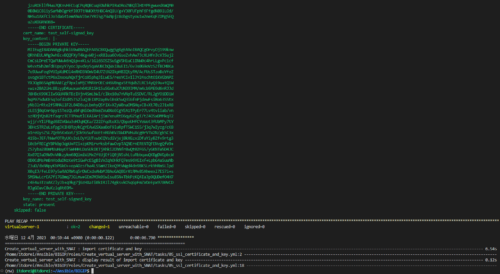
解説(05_ssl_certificate_and_key.yml)
以下のような記述となっています。
—
– name: import certificate and key
f5networks.f5_modules.bigip_ssl_key_cert:
key_content: “{{ item.key_content }}”
key_name: “{{ item.key_name }}”
cert_content: “{{ item.cert_content }}”
cert_name: “{{ item.cert_name }}”
state: “{{ item.state }}”
provider:
server: “{{ ansible_host }}”
user: “{{ ansible_user }}”
password: “{{ ansible_password }}”
validate_certs: no
register: result
loop: “{{ certificate_key }}”
– name: display result of import certificate and key
debug:
var: result
使用しているモジュールについて
f5networks.f5_modules.bigip_ssl_key_certモジュールを使用します。これを使用することで、秘密鍵と証明付き証明書の両方を同時にインストールすることができます。

また、変数ファイルは以下となります。パラメータは適宜変更してください。
※host_vars/virtualserver-1/vars.ymlより引用
##### ssl_certificate用の変数を定義 ####
certificate_key:
– key_content: “{{ lookup(‘file’, ‘./roles/Create_vertual_server_with_SNAT/files/test_self-signed_key.key’) }}”
key_name: test_self-signed_key
cert_content: “{{ lookup(‘file’, ‘./roles/Create_vertual_server_with_SNAT/files/test_self-signed_key’) }}”
cert_name: test_self-signed_key
state: present
※:証明書についてはSSHでBIG-IPのVMにログイン後、以下のコマンドで作成しています。また、鍵長やその他情報については適宜修正してください。あくまでも検証用に命名しています。
【コマンド】
tmsh
create sys crypto key test_self-signed_key key-size 2048 gen-certificate country JP city Tokyo state Tokyo organization ‘ITDOREI, Inc.’ ou ‘network team’ common-name *.itdorei.com lifetime 365
quit
※:また、ファイルについてはroles配下のfilesに格納しています。要件に応じて任意の場所に配置可能です。その場合は、contentの引数であるlookupプラグインのファイル保存場所のディレクトリを修正してください。
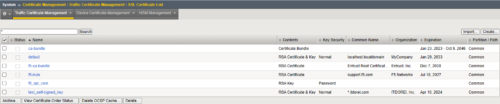
実行結果は次のようになります
BIG-IPのVMを確認したところ、ちゃんと秘密鍵と証明書がインストールされました。
【作業前】

【作業後】

コメント