はじめに
zabbixを初めて触る方でも構築できるよう、手順化しました。
前提
- Linuxの基礎知識があること
- なくても、調べながら自己解決できる
- 仮想化ソフトウェアの操作がわかる
アプライアンスのインストール
次のサイトからダウンロードします。
ダウンロードするアプライアンスのバージョンやplatformは任意のもので構いません。isoをダウンロードします。
サイジング
サイジングですが、最低要件は次の通りです。
CPU:2コア以上
メモリ:1.5GB以上
ディスク:20GB以上
デフォルトのユーザー名とパスワード
次の通りです。
- system(Alma Linux)
root / zabbix - frontend
Admin / zabbix - Database
root / ※仮想マシン作成時にランダムに作成
zabbix / ※仮想マシン作成時にランダムに作成
IPアドレスを静的に設定
デフォルトでは、DHCPでIPアドレスを設定されるようになっています。
固定IPアドレスを使用したい場合は手動で変更する必要があります。
コンソール画面で入力する場合はキーボードの配列が日本と異なるため注意してください。対応表は次の記事で整理しました。Nutanix関係ないです。
I/Fの構成ファイルの次のコマンドで修正します。
vi /etc/sysconfig/network-scripts/ifcfg-eth0
次の値を修正します。
BOOTPROTO=static
また、以下を追加します。
IPADDR="192.168.20.150"
NETMASK="255.255.255.0"
GATEWAY="192.168.20.1"
※IPアドレスやサブネットマスクは環境に応じて修正してください。
設定を反映させるために、ネットワークサービスを再起動させます。
systemctl restart network
設定が正しく反映されているか確認します。
cat /etc/sysconfig/network-scripts/ifcfg-eth0
ip addr show
ip route show
ping 設定したIPアドレス
ping 設定したDGW
タイムゾーンの設定
systemのタイムゾーン
デフォルトではUTCとなっています。変更するには以下のコマンドを投入します。
ln -sf /usr/share/zoneinfo/Asia/Tokyo /etc/localtime

以下のコマンドでも可能です。
timedatectl set-timezone Asia/Tokyo
設定が反映されていることを確認します。
ll /etc/localtime
timedatectl
date
frontendのタイムゾーン
デフォルトでは、Europe/Rigaで設定されています。
こちらも併せて変更します。
vi /etc/php-fpm.d/zabbix.conf
最後の行に以下を追記します。
php_value[date.timezone] = Asia/Tokyo
設定が反映されていることを確認します。
cat /etc/php-fpm.d/zabbix.conf
また、phpの初期設定ファイルもタイムゾーンの修正を行います。
[root@appliance ~]# cat /etc/php.ini | grep timezone
; Defines the default timezone used by the date functions
; http://php.net/date.timezone
;date.timezone =
date.timezoneを次のように修正します。
[root@appliance ~]#vi /etc/php.ini

[Date]
; Defines the default timezone used by the date functions
; http://php.net/date.timezone
date.timezone = Asia/Tokyo
設定が反映されていることを確認します。
cat /etc/php.ini | grep timezone
その後、更にWebコンソールにログインしてタイムゾーンを変更します。
http://設定したIPアドレス/
でログインできます。
その後、User settings > Profile > UserのTime zoneをAsia/Tokyoに変更します。
DNSサーバの設定
設定ファイルを修正します。
vi /etc/resolv.conf

; generated by /usr/sbin/dhclient-script
nameserver 1.1.1.1
nameserver 1.0.0.1
デフォルトで既にDNSサーバが指定されていますが、任意のDNSサーバに変更したい場合は修正してください。

設定が反映されていることを確認します。
cat /etc/resolv.conf
ping google.co.jp
NTPサーバの設定
デフォルトでchronyがインストールされています。
しかし、有効化されていないので以下のコマンドで有効化します。
systemctl enable chronyd
これで、再起動時も自動的に有効化される状態となりました。
次に、参照するNTPサーバを指定します。
vi /etc/chrony.conf

# Use public servers from the pool.ntp.org project.
# Please consider joining the pool (http://www.pool.ntp.org/join.html).
pool 2.almalinux.pool.ntp.org iburst

~省略~
検証用途でインターネットにつながる場合は変更は必要ないですが、社内環境などに閉じている場合は次のようにNTPサーバを指定してください。

;pool 2.almalinux.pool.ntp.org iburst
server ntp.nict.jp iburst
server time.aws.com iburst
設定が反映されていることを確認します。
cat /etc/chrony.conf
systemctl status chronyd
chronyc sources(10分ぐらい放置してから)
ホスト名の設定
ホスト名を変更する場合は以下の対応が必要です。
hostnamectl set-hostname ホスト名
設定が反映されていることを確認します。
cat /etc/hostname
hostnamectl
ロケールの設定
日本語環境の準備のため以下のパッケージをダウンロードします。
dnf -y install glibc-locale-source glibc-langpack-ja zabbix-web-japanese
次のコマンドで設定を行います。
localectl set-locale LANG=ja_JP.utf8
localectl set-keymap jp106
設定が反映されていることを確認します。
localectl
cat /etc/locale.conf
また、Webコンソール画面を日本語化する場合は以下が必要となります。
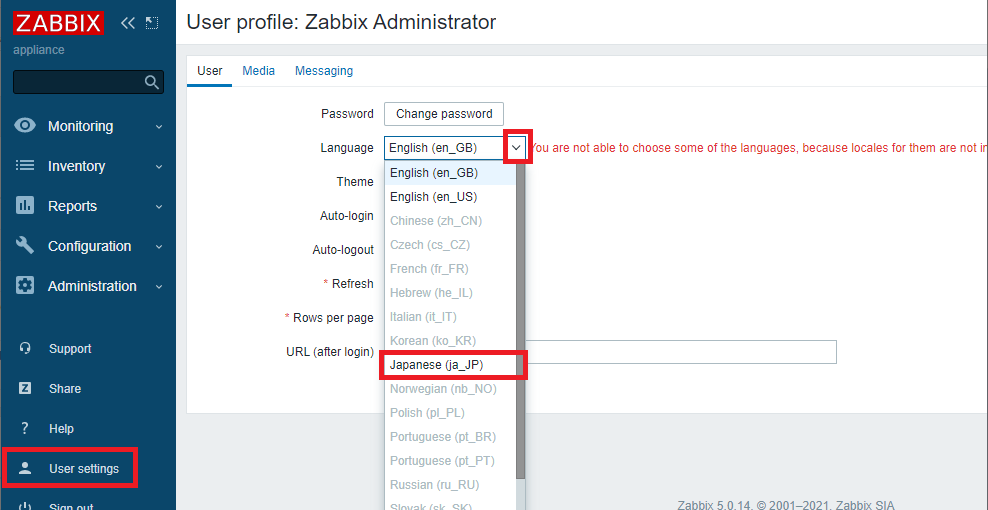
左ペインの”User Settings” > Profile > UserタブのLanguageで japaneseを選択してupdateしてください。
また、文字化けを防ぐためにも日本語フォントの導入も必要に応じて行ってください。
dnf install \
 http://ftp.riken.jp/Linux/centos/7/os/x86_64/Packages/ipa-gothic-fonts-003.03-5.el7.noarch.rpm \
 http://ftp.riken.jp/Linux/centos/7/os/x86_64/Packages/ipa-mincho-fonts-003.03-5.el7.noarch.rpm \
 http://ftp.riken.jp/Linux/centos/7/os/x86_64/Packages/ipa-pgothic-fonts-003.03-5.el7.noarch.rpm \
 http://ftp.riken.jp/Linux/centos/7/os/x86_64/Packages/ipa-pmincho-fonts-003.03-5.el7.noarch.rpm
次のコマンドで確認します。
[root@appliance ~]# ls -l /usr/share/fonts/
total 8
drwxr-xr-x. 2 root root 4096 May 18 15:07 dejavu
drwxr-xr-x 2 root root 4096 May 18 15:52 google-noto-cjk ※新しく追加
さらに、使用するフォントを規定するalternativesに関する変更をします。
ln -sf /usr/share/fonts/ipa-gothic/ipag.ttf /etc/alternatives/zabbix-web-font
次のコマンドで確認します。
[root@appliance ~]# ls -l /etc/alternatives/
total 0
lrwxrwxrwx. 1 root root 37 May 18 15:08 ifdown -> /etc/sysconfig/network-scripts/ifdown
lrwxrwxrwx. 1 root root 35 May 18 15:08 ifup -> /etc/sysconfig/network-scripts/ifup
lrwxrwxrwx. 1 root root 34 May 18 15:07 libnssckbi.so.x86_64 -> /usr/lib64/pkcs11/p11-kit-trust.so
lrwxrwxrwx. 1 root root 22 May 18 15:07 python -> /usr/libexec/no-python
lrwxrwxrwx. 1 root root 43 May 18 15:07 unversioned-python-man -> /usr/share/man/man1/unversioned-python.1.gz
lrwxrwxrwx. 1 root root 29 May 18 15:08 zabbix-server -> /usr/sbin/zabbix_server_mysql
lrwxrwxrwx 1 root root 36 May 18 15:59 zabbix-web-font -> /usr/share/fonts/ipa-gothic/ipag.ttf
[root@appliance ~]#参照元:https://changineer.info/server/monitoring/monitoring_zabbix_japanese.html
Webコンソール画面のHTTPS化
秘密鍵、CSR、自己証明書の作成
次のコマンドで秘密鍵を生成します。
cd /etc/pki
mkdir -p nginx/private ※-pは親ディレクトリも必要に応じて作成するオプション
cd nginx/private
openssl genrsa -out server.key 2048 ※秘密鍵を生成しました。
秘密鍵が出来たことを確認します。
[root@appliance private]# ls
server.key
続いて、CSRを作成します。CSRを作成するには秘密鍵が必要となります。そのため、事前に秘密鍵を作成しております。
[root@appliance private]# openssl req -new -key server.key -out ../server.csr
You are about to be asked to enter information that will be incorporated
into your certificate request.
What you are about to enter is what is called a Distinguished Name or a DN.
There are quite a few fields but you can leave some blank
For some fields there will be a default value,
If you enter '.', the field will be left blank.
-----
Country Name (2 letter code) [XX]:JP
State or Province Name (full name) []:Tokyo
Locality Name (eg, city) [Default City]:Minato-ku
Organization Name (eg, company) [Default Company Ltd]:test
Organizational Unit Name (eg, section) []:test
Common Name (eg, your name or your server's hostname) []:test-zabbix
Email Address []:

Please enter the following 'extra' attributes
to be sent with your certificate request
A challenge password []:
An optional company name []:
[root@appliance private]#
[root@appliance private]#
次に自己証明書を生成します。
[root@appliance private]# cd ..
[root@appliance nginx]# pwd
/etc/pki/nginx
[root@appliance nginx]# vi sans.txt
このファイルはサブジェクト代替名(SANs)を指定するために作成しています。
参考:https://jp.globalsign.com/support/ssl/certificates/about-san.html
最近のブラウザーでは、先ほど指定したCN(Common Name)を参照するのではなく、SANsを参照するためです。こちらとURLのホスト部が一致しないと警告画面が表示されます。
次の内容を追記してください。
subjectAltName = DNS:test-zabbix,IP:192.168.0.21
※個人で設定した情報に修正してください。
※IPアドレス指定でも名前指定にも対応させる場合は例のようにしてください。
そして、自己証明書の生成を行います。
[root@appliance nginx]# ll
total 8
drwxr-xr-x 2 root root 24 May 18 16:15 private
-rw-r--r-- 1 root root 49 May 18 16:20 sans.txt
-rw-r--r-- 1 root root 1001 May 18 16:18 server.csr

[root@appliance nginx]# openssl x509 -req -days 3600 -in server.csr -signkey private/server.k
ey -out server.crt -extfile sans.txt
Signature ok
subject=C = JP, ST = Tokyo, L = Minato-ku, O = test, OU = test, CN = test-zabbix
Getting Private key
nginxの設定変更
zabbixのnginxの設定ファイルが格納されているディレクトリに移動します。
また、構成ファイルのバックアップも取得します。名前は好きな任意でOKです。
cd /etc/nginx/conf.d/
cp -p zabbix.conf backup_zabbix.conf
その後、次のコマンドで編集します。
vi zabbix.conf
以下のように修正します。
server {
listen 443 ssl;
server_name test-zabbix; ※サブジェクト代替名で指定した名前
ssl_certificate /etc/pki/nginx/server.crt; ※作成した自己証明書
ssl_certificate_key /etc/pki/nginx/private/server.key; ※自己証明書を作成する時に使用した秘密鍵
その後、設定を反省させるためにサービスを再起動します。
systemctl restart nginx
次は、https://設定したIPアドレス or 名前でブラウザからアクセスすると、証明書の警告画面が表示されるはずです。これでHTTPS化の対応が完了です。
デフォルトのパスワードの変更
必要に応じてパスワードを変更してください。
[root@appliance conf.d]# cat /etc/passwd | grep root
root:x:0:0:root:/root:/bin/bash

[root@appliance conf.d]# passwd root
Changing password for user root.
New password:
Retype new password:
passwd: all authentication tokens updated successfully.
ちなみにですが、パスワードの期限は実質無期限となっていました。
[root@appliance conf.d]# chage --list root
Last password change : May 18, 2024
Password expires : never
Password inactive : never
Account expires : never
Minimum number of days between password change : 0
Maximum number of days between password change : 99999
Number of days of warning before password expires : 7
[root@appliance conf.d]#
新規ユーザーの作成
system
次のように設定します。
参考:https://atmarkit.itmedia.co.jp/ait/articles/1811/02/news035.html
[root@appliance conf.d]# useradd -m test -u 1001 -p password -f -1 -c test
※ユーザーIDを1001, パスワードを事前に設定、コメント追加、パスワード期限切れでアカウント停止とならない
[root@appliance conf.d]#
[root@appliance conf.d]#
[root@appliance conf.d]# cat /etc/passwd | grep test
test:x:1001:1001:test:/home/test:/bin/bash
[root@appliance conf.d]#
frontend
ユーザーを作成する場合は、Webコンソールの左ペインからユーザー > ユーザー を選択します。右上にユーザーの作成ボタンがあるのでクリックします。
詳細は次の公式ドキュメントを参照ください。
SSHの設定強化
デフォルトではsshd_configの設定は以下の通りとなります。
必要に応じて、セキュリティ設定を強化してください。
公開鍵認証の設定方法については次の記事で解説しています。

[root@appliance ~]# cat /etc/ssh/sshd_config
# $OpenBSD: sshd_config,v 1.103 2018/04/09 20:41:22 tj Exp $

# This is the sshd server system-wide configuration file. See
# sshd_config(5) for more information.

# This sshd was compiled with PATH=/usr/local/bin:/usr/bin:/usr/local/sbin:/usr/sbin

# The strategy used for options in the default sshd_config shipped with
# OpenSSH is to specify options with their default value where
# possible, but leave them commented. Uncommented options override the
# default value.

# If you want to change the port on a SELinux system, you have to tell
# SELinux about this change.
# semanage port -a -t ssh_port_t -p tcp #PORTNUMBER
#
#Port 22
#例:systemへアクセスする場合のポート番号を指定(デフォルトで22)
port 22
port 50022
#AddressFamily any
#ListenAddress 0.0.0.0
#例:systemへアクセスする送信元IPアドレスを指定(デフォルトは全許可)
ListenAddress 192.168.0.134
#ListenAddress ::

HostKey /etc/ssh/ssh_host_rsa_key
HostKey /etc/ssh/ssh_host_ecdsa_key
HostKey /etc/ssh/ssh_host_ed25519_key

# Ciphers and keying
#RekeyLimit default none

# This system is following system-wide crypto policy. The changes to
# crypto properties (Ciphers, MACs, ...) will not have any effect here.
# They will be overridden by command-line options passed to the server
# on command line.
# Please, check manual pages for update-crypto-policies(8) and sshd_config(5).

# Logging
#SyslogFacility AUTH
SyslogFacility AUTHPRIV
#LogLevel INFO

# Authentication:

#LoginGraceTime 2m
PermitRootLogin no
※デフォルトではyesとなっています。
※新しいユーザーを作成してからnoにするようにしてください。
※sshでログインができなくなります。
#StrictModes yes
#MaxAuthTries 6
#MaxSessions 10

#PubkeyAuthentication yes

# The default is to check both .ssh/authorized_keys and .ssh/authorized_keys2
# but this is overridden so installations will only check .ssh/authorized_keys
AuthorizedKeysFile .ssh/authorized_keys

#AuthorizedPrincipalsFile none

#AuthorizedKeysCommand none
#AuthorizedKeysCommandUser nobody

# For this to work you will also need host keys in /etc/ssh/ssh_known_hosts
#HostbasedAuthentication no
# Change to yes if you don't trust ~/.ssh/known_hosts for
# HostbasedAuthentication
#IgnoreUserKnownHosts no
# Don't read the user's ~/.rhosts and ~/.shosts files
#IgnoreRhosts yes

# To disable tunneled clear text passwords, change to no here!
#PasswordAuthentication yes
#PermitEmptyPasswords no
#例:空のパスワードを禁止とする
PermitEmptyPasswords yes
PasswordAuthentication no
※デフォルトではyesとなっています。
※noにすることで、パスワードによるログイン禁止(公開鍵認証の設定を事前にする必要がある)

# Change to no to disable s/key passwords
#ChallengeResponseAuthentication yes
ChallengeResponseAuthentication yes
※デフォルトではnoとなっています。
※パスワード認証が有効な場合、チャレンジレスポンスによる認証が必須となります。

# Kerberos options
#KerberosAuthentication no
#KerberosOrLocalPasswd yes
#KerberosTicketCleanup yes
#KerberosGetAFSToken no
#KerberosUseKuserok yes

# GSSAPI options
GSSAPIAuthentication yes
GSSAPICleanupCredentials no
#GSSAPIStrictAcceptorCheck yes
#GSSAPIKeyExchange no
#GSSAPIEnablek5users no

# Set this to 'yes' to enable PAM authentication, account processing,
# and session processing. If this is enabled, PAM authentication will
# be allowed through the ChallengeResponseAuthentication and
# PasswordAuthentication. Depending on your PAM configuration,
# PAM authentication via ChallengeResponseAuthentication may bypass
# the setting of "PermitRootLogin without-password".
# If you just want the PAM account and session checks to run without
# PAM authentication, then enable this but set PasswordAuthentication
# and ChallengeResponseAuthentication to 'no'.
# WARNING: 'UsePAM no' is not supported in RHEL and may cause several
# problems.
UsePAM yes

#AllowAgentForwarding yes
#AllowTcpForwarding yes
#GatewayPorts no
X11Forwarding yes
#X11DisplayOffset 10
#X11UseLocalhost yes
#PermitTTY yes

# It is recommended to use pam_motd in /etc/pam.d/sshd instead of PrintMotd,
# as it is more configurable and versatile than the built-in version.
PrintMotd no

#PrintLastLog yes
#TCPKeepAlive yes
#PermitUserEnvironment no
#Compression delayed
#ClientAliveInterval 0
#ClientAliveCountMax 3
#UseDNS no
#PidFile /var/run/sshd.pid
#MaxStartups 10:30:100
#PermitTunnel no
#ChrootDirectory none
#VersionAddendum none

# no default banner path
#Banner none

# Accept locale-related environment variables
AcceptEnv LANG LC_CTYPE LC_NUMERIC LC_TIME LC_COLLATE LC_MONETARY LC_MESSAGES
AcceptEnv LC_PAPER LC_NAME LC_ADDRESS LC_TELEPHONE LC_MEASUREMENT
AcceptEnv LC_IDENTIFICATION LC_ALL LANGUAGE
AcceptEnv XMODIFIERS

# override default of no subsystems
Subsystem sftp /usr/libexec/openssh/sftp-server

# Example of overriding settings on a per-user basis
#Match User anoncvs
# X11Forwarding no
# AllowTcpForwarding no
# PermitTTY no
# ForceCommand cvs server
設定ファイルを修正した場合は、次のコマンドで構文を確認します。
sshd -tエラーがでなければ、次のコマンドで設定を反映させます。
systemctl restart sshd
HSTS(Hypertext Strict Transport Security)の設定
HSTSを使用させることでHTTPにダウングレードすることを防ぎます。
zabbixにおけるnginxの設定ファイルを修正します。
vi /etc/nginx/conf.d/zabbix.conf
ここで赤字のように追加します。
server {
listen 443 ssl;
server_name test-zabbix;
ssl_certificate /etc/pki/nginx/server.crt;
ssl_certificate_key /etc/pki/nginx/private/server.key;

root /usr/share/zabbix;

index index.php;

add_header Strict-Transport-Security 'max-age=31536000; includeSubDomains; preload';
その後、設定を反映させるためにサービスを再起動します。
systemctl restart nginx
その他のnginxのセキュリティ強化に向けた設定
検索したら沢山ヒットします。参考に載せておきます。


zabbixで推奨されているセキュリティ設定は次のドキュメントに載っています。
ログファイルの場所
/var/log/zabbixにあります。
次のコマンドでリアルタイムにログの確認が可能です。
tail -f /var/log/zabbix/ログファイル
zabbisサーバのキャッシュサイズの変更
次のようにCacheSizeを必要に応じて修正してください。デフォルトでは32MBのようですが、監視対象の機器が増えるに従い足りなくなります。ここが原因でホストを登録した後に正常ステータスに移行しないことがあります。
[root@zabbix ~]# cat /etc/zabbix/zabbix_server.conf | grep Cache
### Option: VMwareCacheSize
# VMwareCacheSize=8M
### Option: CacheSize
CacheSize=1024M ※値は任意
関連記事
ZabbixでSNMP Trap監視を行うための手順について丁寧に解説しております。
zabbixアプライアンスでMYSQL用のディレクトリのディスク容量は数GBしかありません。本番運用や負荷が高めの検証用途で使用するならばディスク拡張が必須です。誰でもできるように手順を用意しました。
参考


コメント