
はじめに
LPIC Level2の復習を兼ねて、Apacheサーバの構築手順を残します。
HTTPS且つセキュリティにも考慮しています。
また、Virtual hostを用いて1台のサーバで複数のポートをリッスンできるようにもしています。
次の記事で、設定項目であるディレクティブ、ダイジェスト認証、バーチャルホストについて解説しています。

リポジトリでhttpdのパッケージが提供されているかを確認
以下のコマンドを実行します。
dnf info httpd
インストール
以下のコマンドを実行します。
dnf install -y httpd
バージョンの確認
以下のコマンドを実行します。
httpd -version
httpdの有効化・起動
以下のコマンドを実行します。
systemctl is-enabled httpd
systemctl enable httpd
systemctl start httpd
systemctl status httpd
firewwalldでhttpを許可
以下のコマンドを実行します。
firewall-cmd --add-service=http --zone=public --permanent
firewall-cmd --reload
firewall-cmd --list-all
ブラウザでアクセス確認
ブラウザから、http://IPアドレス/ へアクセスする。
HTTPS化の対応
mod_sslモジュールのインストールするために以下のコマンドを実行します。
dnf install mod_ssl -y
httpd -M | grep ssl
秘密鍵・サーバ証明書の作成
次のコマンドを投入してください。
具体的には
- tlsというフォルダを作成
- tlsフォルダで秘密鍵、CSR、署名付き証明書(自己署名)を作成
- /etc/pki/tls/へ署名付き証明書、秘密鍵専用のフォルダを作成
- tlsフォルダからそれぞれ証明書や秘密鍵を移動
mkdir tls
cd tls/
openssl genrsa > server.key
ls
openssl req -new -key server.key > server.csr
ls
openssl x509 -req -signkey server.key < server.csr > server.crt
ls
mkdir /etc/pki/tls/certs/apache/
mkdir /etc/pki/tls/private/apache/
mv server.crt /etc/pki/tls/certs/apache/
mv server.key /etc/pki/tls/private/apache/
ls /etc/pki/tls/certs/apache/
ls /etc/pki/tls/private/apache/
証明書・秘密鍵のパスの指定
/etc/httpd/conf.d/ssl.confをviエディタなどで修正します。
署名付き証明書と秘密鍵を絶対パスで指定します。
水色で表示しています。
#
# When we also provide SSL we have to listen to the
# standard HTTPS port in addition.
#
Listen 443 https

##
## SSL Global Context
##
## All SSL configuration in this context applies both to
## the main server and all SSL-enabled virtual hosts.
##

# Pass Phrase Dialog:
# Configure the pass phrase gathering process.
# The filtering dialog program (`builtin' is a internal
# terminal dialog) has to provide the pass phrase on stdout.
SSLPassPhraseDialog exec:/usr/libexec/httpd-ssl-pass-dialog

# Inter-Process Session Cache:
# Configure the SSL Session Cache: First the mechanism
# to use and second the expiring timeout (in seconds).
SSLSessionCache shmcb:/run/httpd/sslcache(512000)
"/etc/httpd/conf.d/ssl.conf" 203L, 8720B 1,1 先頭
#
# When we also provide SSL we have to listen to the
# standard HTTPS port in addition.
#
Listen 443 https

##
## SSL Global Context
##
## All SSL configuration in this context applies both to
## the main server and all SSL-enabled virtual hosts.
##

# Pass Phrase Dialog:
# Configure the pass phrase gathering process.
# The filtering dialog program (`builtin' is a internal
# terminal dialog) has to provide the pass phrase on stdout.
SSLPassPhraseDialog exec:/usr/libexec/httpd-ssl-pass-dialog

# Inter-Process Session Cache:
# Configure the SSL Session Cache: First the mechanism
# to use and second the expiring timeout (in seconds).
SSLSessionCache shmcb:/run/httpd/sslcache(512000)
SSLSessionCacheTimeout 300

#
# Use "SSLCryptoDevice" to enable any supported hardware
# accelerators. Use "openssl engine -v" to list supported
# engine names. NOTE: If you enable an accelerator and the
# server does not start, consult the error logs and ensure
# your accelerator is functioning properly.
#
SSLCryptoDevice builtin
#SSLCryptoDevice ubsec

##
## SSL Virtual Host Context
##

<VirtualHost _default_:443>

# General setup for the virtual host, inherited from global configuration
#DocumentRoot "/var/www/html"
#ServerName www.example.com:443

# Use separate log files for the SSL virtual host; note that LogLevel
# is not inherited from httpd.conf.
ErrorLog logs/ssl_error_log
TransferLog logs/ssl_access_log
LogLevel warn

# SSL Engine Switch:
# Enable/Disable SSL for this virtual host.
SSLEngine on

# List the protocol versions which clients are allowed to connect with.
# The OpenSSL system profile is used by default. See
# update-crypto-policies(8) for more details.
#SSLProtocol all -SSLv3
#SSLProxyProtocol all -SSLv3

# User agents such as web browsers are not configured for the user's
# own preference of either security or performance, therefore this
# must be the prerogative of the web server administrator who manages
# cpu load versus confidentiality, so enforce the server's cipher order.
SSLHonorCipherOrder on

# SSL Cipher Suite:
# List the ciphers that the client is permitted to negotiate.
# See the mod_ssl documentation for a complete list.
# The OpenSSL system profile is configured by default. See
# update-crypto-policies(8) for more details.
SSLCipherSuite PROFILE=SYSTEM
SSLProxyCipherSuite PROFILE=SYSTEM

# Point SSLCertificateFile at a PEM encoded certificate. If
# the certificate is encrypted, then you will be prompted for a
# pass phrase. Note that restarting httpd will prompt again. Keep
# in mind that if you have both an RSA and a DSA certificate you
# can configure both in parallel (to also allow the use of DSA
# ciphers, etc.)
# Some ECC cipher suites (http://www.ietf.org/rfc/rfc4492.txt)
# require an ECC certificate which can also be configured in
# parallel.
#SSLCertificateFile /etc/pki/tls/certs/localhost.crt
SSLCertificateFile /etc/pki/tls/certs/apache/server.crt

# Server Private Key:
# If the key is not combined with the certificate, use this
# directive to point at the key file. Keep in mind that if
# you've both a RSA and a DSA private key you can configure
# both in parallel (to also allow the use of DSA ciphers, etc.)
# ECC keys, when in use, can also be configured in parallel
#SSLCertificateKeyFile /etc/pki/tls/private/localhost.key
SSLCertificateKeyFile /etc/pki/tls/private/apache/server.key

# Server Certificate Chain:
# Point SSLCertificateChainFile at a file containing the
# concatenation of PEM encoded CA certificates which form the
# certificate chain for the server certificate. Alternatively
# the referenced file can be the same as SSLCertificateFile
# when the CA certificates are directly appended to the server
# certificate for convenience.
#SSLCertificateChainFile /etc/pki/tls/certs/server-chain.crt

# Certificate Authority (CA):
# Set the CA certificate verification path where to find CA
# certificates for client authentication or alternatively one
# huge file containing all of them (file must be PEM encoded)
#SSLCACertificateFile /etc/pki/tls/certs/ca-bundle.crt

# Client Authentication (Type):
# Client certificate verification type and depth. Types are
# none, optional, require and optional_no_ca. Depth is a
# number which specifies how deeply to verify the certificate
# issuer chain before deciding the certificate is not valid.
#SSLVerifyClient require
#SSLVerifyDepth 10

# Access Control:
# With SSLRequire you can do per-directory access control based
# on arbitrary complex boolean expressions containing server
# variable checks and other lookup directives. The syntax is a
# mixture between C and Perl. See the mod_ssl documentation
# for more details.
#<Location />
#SSLRequire ( %{SSL_CIPHER} !~ m/^(EXP|NULL)/ \
# and %{SSL_CLIENT_S_DN_O} eq "Snake Oil, Ltd." \
# and %{SSL_CLIENT_S_DN_OU} in {"Staff", "CA", "Dev"} \
# and %{TIME_WDAY} >= 1 and %{TIME_WDAY} <= 5 \
# and %{TIME_HOUR} >= 8 and %{TIME_HOUR} <= 20 ) \
# or %{REMOTE_ADDR} =~ m/^192\.76\.162\.[0-9]+$/
#</Location>

# SSL Engine Options:
# Set various options for the SSL engine.
# o FakeBasicAuth:
# Translate the client X.509 into a Basic Authorisation. This means that
# the standard Auth/DBMAuth methods can be used for access control. The
# user name is the `one line' version of the client's X.509 certificate.
# Note that no password is obtained from the user. Every entry in the user
# file needs this password: `xxj31ZMTZzkVA'.
# o ExportCertData:
# This exports two additional environment variables: SSL_CLIENT_CERT and
# SSL_SERVER_CERT. These contain the PEM-encoded certificates of the
# server (always existing) and the client (only existing when client
# authentication is used). This can be used to import the certificates
# into CGI scripts.
# o StdEnvVars:
# This exports the standard SSL/TLS related `SSL_*' environment variables.
# Per default this exportation is switched off for performance reasons,
# because the extraction step is an expensive operation and is usually
# useless for serving static content. So one usually enables the
# exportation for CGI and SSI requests only.
# o StrictRequire:
# This denies access when "SSLRequireSSL" or "SSLRequire" applied even
# under a "Satisfy any" situation, i.e. when it applies access is denied
# and no other module can change it.
# o OptRenegotiate:
# This enables optimized SSL connection renegotiation handling when SSL
# directives are used in per-directory context.
#SSLOptions +FakeBasicAuth +ExportCertData +StrictRequire
<FilesMatch "\.(cgi|shtml|phtml|php)$">
SSLOptions +StdEnvVars
</FilesMatch>
<Directory "/var/www/cgi-bin">
SSLOptions +StdEnvVars
</Directory>

# SSL Protocol Adjustments:
# The safe and default but still SSL/TLS standard compliant shutdown
# approach is that mod_ssl sends the close notify alert but doesn't wait for
# the close notify alert from client. When you need a different shutdown
# approach you can use one of the following variables:
# o ssl-unclean-shutdown:
# This forces an unclean shutdown when the connection is closed, i.e. no
# SSL close notify alert is sent or allowed to be received. This violates
# the SSL/TLS standard but is needed for some brain-dead browsers. Use
# this when you receive I/O errors because of the standard approach where
# mod_ssl sends the close notify alert.
# o ssl-accurate-shutdown:
# This forces an accurate shutdown when the connection is closed, i.e. a
# SSL close notify alert is sent and mod_ssl waits for the close notify
# alert of the client. This is 100% SSL/TLS standard compliant, but in
# practice often causes hanging connections with brain-dead browsers. Use
# this only for browsers where you know that their SSL implementation
# works correctly.
# Notice: Most problems of broken clients are also related to the HTTP
# keep-alive facility, so you usually additionally want to disable
# keep-alive for those clients, too. Use variable "nokeepalive" for this.
# Similarly, one has to force some clients to use HTTP/1.0 to workaround
# their broken HTTP/1.1 implementation. Use variables "downgrade-1.0" and
# "force-response-1.0" for this.
BrowserMatch "MSIE [2-5]" \
nokeepalive ssl-unclean-shutdown \
downgrade-1.0 force-response-1.0

# Per-Server Logging:
# The home of a custom SSL log file. Use this when you want a
# compact non-error SSL logfile on a virtual host basis.
CustomLog logs/ssl_request_log \
"%t %h %{SSL_PROTOCOL}x %{SSL_CIPHER}x \"%r\" %b"

</VirtualHost>
設定ファイルの確認
次のコマンドを実行します。
cat /etc/httpd/conf.d/ssl.conf | grep SSLCertificateFile
cat /etc/httpd/conf.d/ssl.conf | grep SSLCertificateKeyFile
再起動
設定を反映させるためhttpdを再起動します。
ここで、SELinuxを無効化しなければ証明書の読み取りに失敗するため、一時的に無効化しています。
setenforce 0  ※SELinuxを一時的に無効化。無効化しないと証明書の読み取りに失敗して起動できない。
systemctl restart httpd
systemctl status httpd
永久に無効化する場合は次のようにしてください。
vi /etc/selinux/config

#SELINUXTYPE=targeted
SELINUXTYPE=disabled  # disabledにすればSELinuxが無効化される。
firewalldでhttpsを許可
次のコマンドを実行します。
firewall-cmd --add-service=https --zone=public --permanent
firewall-cmd --reload
firewall-cmd --list-all
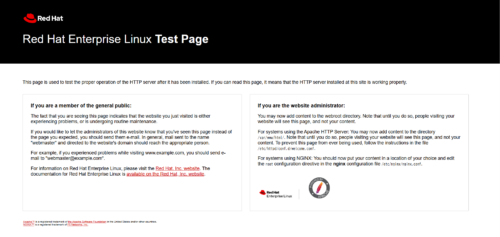
ブラウザでアクセス確認
ブラウザから、https://IPアドレス/ へアクセスします。
すると、testページが表示されたはずです。
セキュリティ対策その1
インデックスファイルが存在しないディレクトリにて、ディレクトリ内のファイルが自動的に一覧表示されるAutoindex機能を無効化。空ファイルとする。アップデートすると再作成されるため削除は行わない。
cat /dev/null > /etc/httpd/conf.d/autoindex.conf
ユーザーのホームディレクトリ内にある特定のサブディレクトリのコンテンツをウェブサーバからアクセスさせるために使用。ユーザーごとの個人Webページは不要なので無効化。
cat /dev/null > /etc/httpd/conf.d/userdir.conf
ドキュメントルートにファイルがない場合、テストページを表示。不要な情報なので空ファイルとする。アップデートすると再作成されるため削除は行わない。
cat /dev/null > /etc/httpd/conf.d/welcome.conf
不要なモジュールのため無効化
cat /dev/null > /etc/httpd/conf.modules.d/00-dav.conf
cat /dev/null > /etc/httpd/conf.modules.d/01-cgi.conf
cat /dev/null > /etc/httpd/conf.modules.d/00-lua.conf
ここで、設定に問題ないことを確認するために次のコマンドを実行します。
apachectl configtest
セキュリティ対策その2
/etc/httpd/conf.d/security.confを作成します。
touch /etc/httpd/conf.d/security.conf
そして、この構成ファイルを修正します。
vi /etc/httpd/conf.d/security.conf
次の設定を転記します。
# バージョン情報の隠蔽
ServerTokens ProductOnly
ServerSignature Off

# レスポンスヘッダからX-Powered-Byを削除
Header always unset "X-Powered-By"

# inode情報の隠蔽
FileETag None

# httproxy 対策
RequestHeader unset Proxy

# クリックジャッキング対策
Header always set X-Frame-Options "SAMEORIGIN"

# XSS対策
Header always set X-XSS-Protection "1; mode=block"
Header always set X-Content-Type-Options "nosniff"

# XST対策
TraceEnable Off

<Directory /var/www/html>
# .htaccess の有効化
AllowOverride All
# ファイル一覧出力の禁止
Options -Indexes
</Directory>
ここで、設定に問題ないことを確認するために次のコマンドを実行します。
apachectl configtest
セキュリティ対策その3
CGIを無効化します。
vi /etc/httpd/conf/httpd.conf
次を参考に設定を修正します。
#
# "/var/www/cgi-bin" should be changed to whatever your ScriptAliased
# CGI directory exists, if you have that configured.
#
<Directory "/var/www/cgi-bin">
AllowOverride None
Options None
Require all granted
</Directory>
また、ssl.confも修正します。
vi /etc/httpd/conf.d/ssl.conf
<FilesMatch "\.(cgi|shtml|phtml|php)$">
SSLOptions +StdEnvVars
</FilesMatch>
<Directory "/var/www/cgi-bin">
SSLOptions +StdEnvVars
</Directory>
ここで、設定に問題ないことを確認するために次のコマンドを実行します。
apachectl configtest
セキュリティ対策その4
HSTSを有効化します。
vi /etc/httpd/conf.d/ssl.conf
<VirtualHost _default_:443>
Header always set Strict-Transport-Security "max-age=31536000; includeSubDomains"
</VirtualHost>
ここで、設定に問題ないことを確認するために次のコマンドを実行します。
apachectl configtest
セキュリティ対策その5
暗号スイートの設定を行います。脆弱性のある暗号化スイートを使用させないようにするならば、設計を考慮したほうがよいでしょう。
vi /etc/httpd/conf.d/ssl.conf
# TLS 1.3
SSLCipherSuite TLSv1.3 "TLS_AES_256_GCM_SHA384:TLS_CHACHA20_POLY1305_SHA256:TLS_AES_128_GCM_SHA256:TLS_AES_128_CCM_SHA256:TLS_AES_128_CCM_8_SHA256"

# TLS 1.2以前
SSLCipherSuite "ECDHE-ECDSA-AES256-GCM-SHA384:ECDHE-RSA-AES256-GCM-SHA384:ECDHE-ECDSA-AES256-CCM:ECDHE-ECDSA-AES256-CCM8:ECDHE-ECDSA-CHACHA20-POLY1305:ECDHE-RSA-CHACHA20-POLY1305:ECDHE-ECDSA-AES128-GCM-SHA256:ECDHE-RSA-AES128-GCM-SHA256:ECDHE-ECDSA-AES128-CCM:ECDHE-ECDSA-AES128-CCM8:DHE-RSA-AES256-GCM-SHA384:DHE-RSA-AES256-CCM:DHE-RSA-AES256-CCM8:DHE-RSA-CHACHA20-POLY1305:DHE-RSA-AES128-GCM-SHA256:DHE-RSA-AES128-CCM:DHE-RSA-AES128-CCM8"
使用するTLSのバージョン指定を行います。
SSLv3.0、TLS1.0、TLS1.1は脆弱性があるため使用してはいけません。
# TLS 1.3
SSLProtocol -all +TLSv1.2 +TLSv1.3

# TLS 1.2以前
SSLProtocol -all +TLSv1.2
CRIME攻撃対策として、TLSの圧縮機能を無効化。
# SSL/TLSの圧縮機能を無効化
SSLCompression off
セキュリティ対策ではありませんが、TLS高速化のため、セッションのキャッシュ保持期間を長くします。
#SSLSessionCacheTimeout 300
SSLSessionCacheTimeout 3600
ここで、設定に問題ないことを確認するために次のコマンドを実行します。
apachectl configtest
セキュリティ対策その6
DoS対策を行います。新しく構成ファイルを作成します。
touch /etc/httpd/conf.d/security-strict.conf
編集します。
vi /etc/httpd/conf.d/security-strict.conf
# DoS 攻撃対策
# HTTPリクエストボディに許されるバイト数を指定。上限は2GB(2147483647)
# 例では10MiBで制限
LimitRequestBody 10485760
# HTTPリクエストで許可するリクエストヘッダーフィールド数。20を超えることはほとんどないが一部bad requestを返すため50で設定。
LimitRequestFields 50
# リクエストヘッダーの最大サイズ
LimitRequestFieldSize 4096
# リクエストラインの最大サイズ(各リクエストの最初のライン)
LimitRequestLine 4096
# slowloris 対策
RequestReadTimeout header=20-40,MinRate=500 body=20,MinRate=500
また、HTTPメソッドを制限する場合は次のように制限することが可能です。
CGIはここでも無効化します。
# HTTPメソッドの制限
<Directory /var/www/html>
Require method GET POST
</Directory>

# CGIの無効化
<Directory "/var/www/cgi-bin">
Require all denied
</Directory>
ここで、設定に問題ないことを確認するために次のコマンドを実行します。
apachectl configtest
セキュリティ対策その7
HTTPリクエストがどのServerNameディレクティブにもマッチしない場合、一番最初のVirtualHostによって処理されることから、IPアドレス、逆引きアドレスからのアクセスを無効化するため、ダミーのVirtual-Hostを設定します。
HTTPの場合
vi /etc/httpd/conf/httpd.conf
<VirtualHost *:80>
SeverName dummy.example.com
Redirect 404 /
</VirtualHost>
HTTPSの場合
vi /etc/httpd/conf.d/ssl.conf
<VirtualHost *:443>
SeverName dummy.example.com
Redirect 404 /
</VirtualHost>
ここで、設定に問題ないことを確認するために次のコマンドを実行します。
apachectl configtest
参考


コメント